Generators
 Repair
 Total Protection Plan
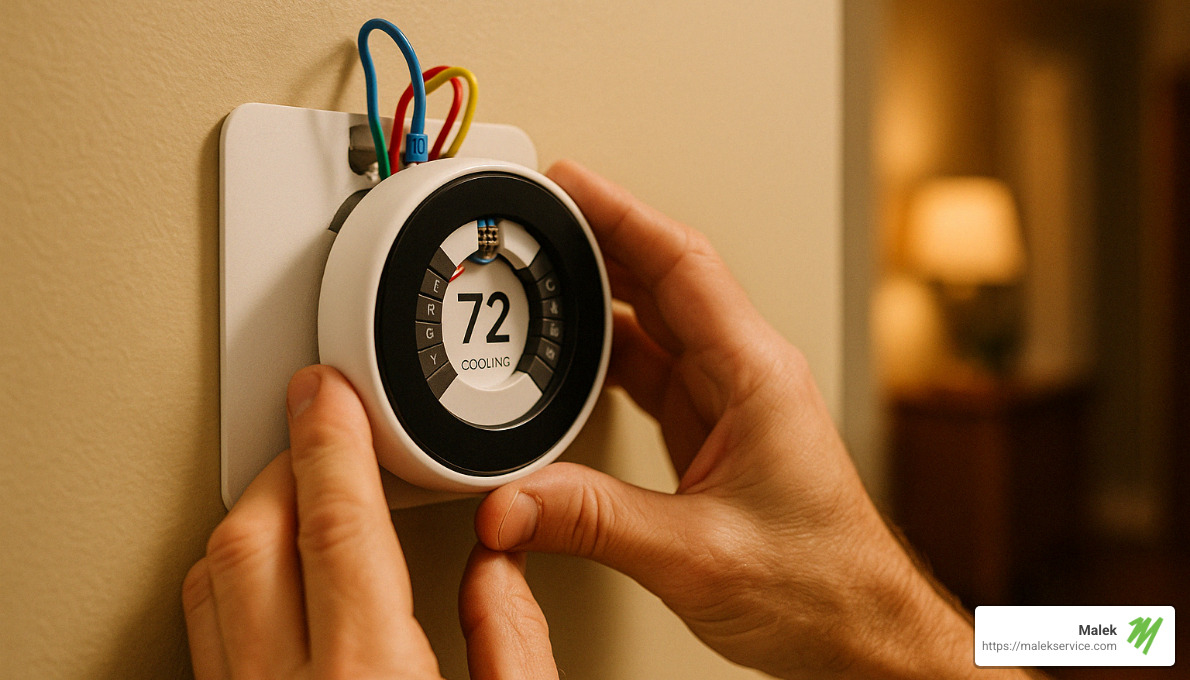
Understanding the C Wire: The Key to Smart Thermostat Success
Thermostat wiring with C wire is essential for powering modern smart thermostats that require continuous 24-volt power. Here’s what you need to know:
| C Wire Basics | Description |
|---|---|
| Purpose | Provides continuous power return path for smart thermostats |
| Color | Typically blue or black (sometimes brown or purple) |
| Connection | Goes from thermostat “C” terminal to HVAC control board “C” terminal |
| Voltage | Completes 24V AC circuit with the R wire |
| Necessity | Required for most Wi-Fi thermostats with color displays |
If you’re upgrading to a smart thermostat, you’ll likely need a C wire to power its Wi-Fi connectivity, touchscreen display, and advanced features. Without this common wire, your smart thermostat might experience intermittent power issues, Wi-Fi disconnects, or rapid battery drain.
Most newer homes (built in the last 40 years) already have the proper wiring including a C wire, but older heating systems often lack this crucial connection. The good news? Even if your current setup doesn’t have a C wire, there are several straightforward solutions that we’ll cover in this guide.
I’m Courtney Zalesak, Vice President at Malek Service Company, and I’ve spent over a decade helping homeowners solve their HVAC challenges, including countless thermostat wiring with C wire installations across Texas that have transformed outdated systems into energy-efficient smart homes.
Similar topics to thermostat wiring with c wire:
– Thermostat wiring
– Thermostat wiring no C wire
C Wire 101: What & Why Smart Thermostats Need It
That little blue wire might not look important, but when it comes to thermostat wiring with C wire, it’s the unsung hero of your smart home. Think of your C wire as the silent partner that keeps your fancy thermostat running smoothly day and night.
Unlike those old-school mercury thermostats that could run on just a couple of AA batteries, today’s smart thermostats are basically mini-computers. They’re constantly maintaining Wi-Fi connections, lighting up colorful touchscreens, and running complex energy-saving algorithms. All that tech wizardry requires a steady diet of power.
“I can’t tell you how many frustrated homeowners call us because their new $250 smart thermostat keeps going offline,” says our lead technician. “Nine times out of ten, it’s a missing C wire issue.”
The data backs this up too. Energy Star statistics show that properly powered smart thermostats can save homeowners an average of 8% on heating and cooling costs – but only if they have reliable power to run their energy optimization features.
Some manufacturers try to work around the C wire requirement with “power stealing” technology (borrowing tiny amounts of electricity from other wires), but this method has serious limitations and often leads to system problems.
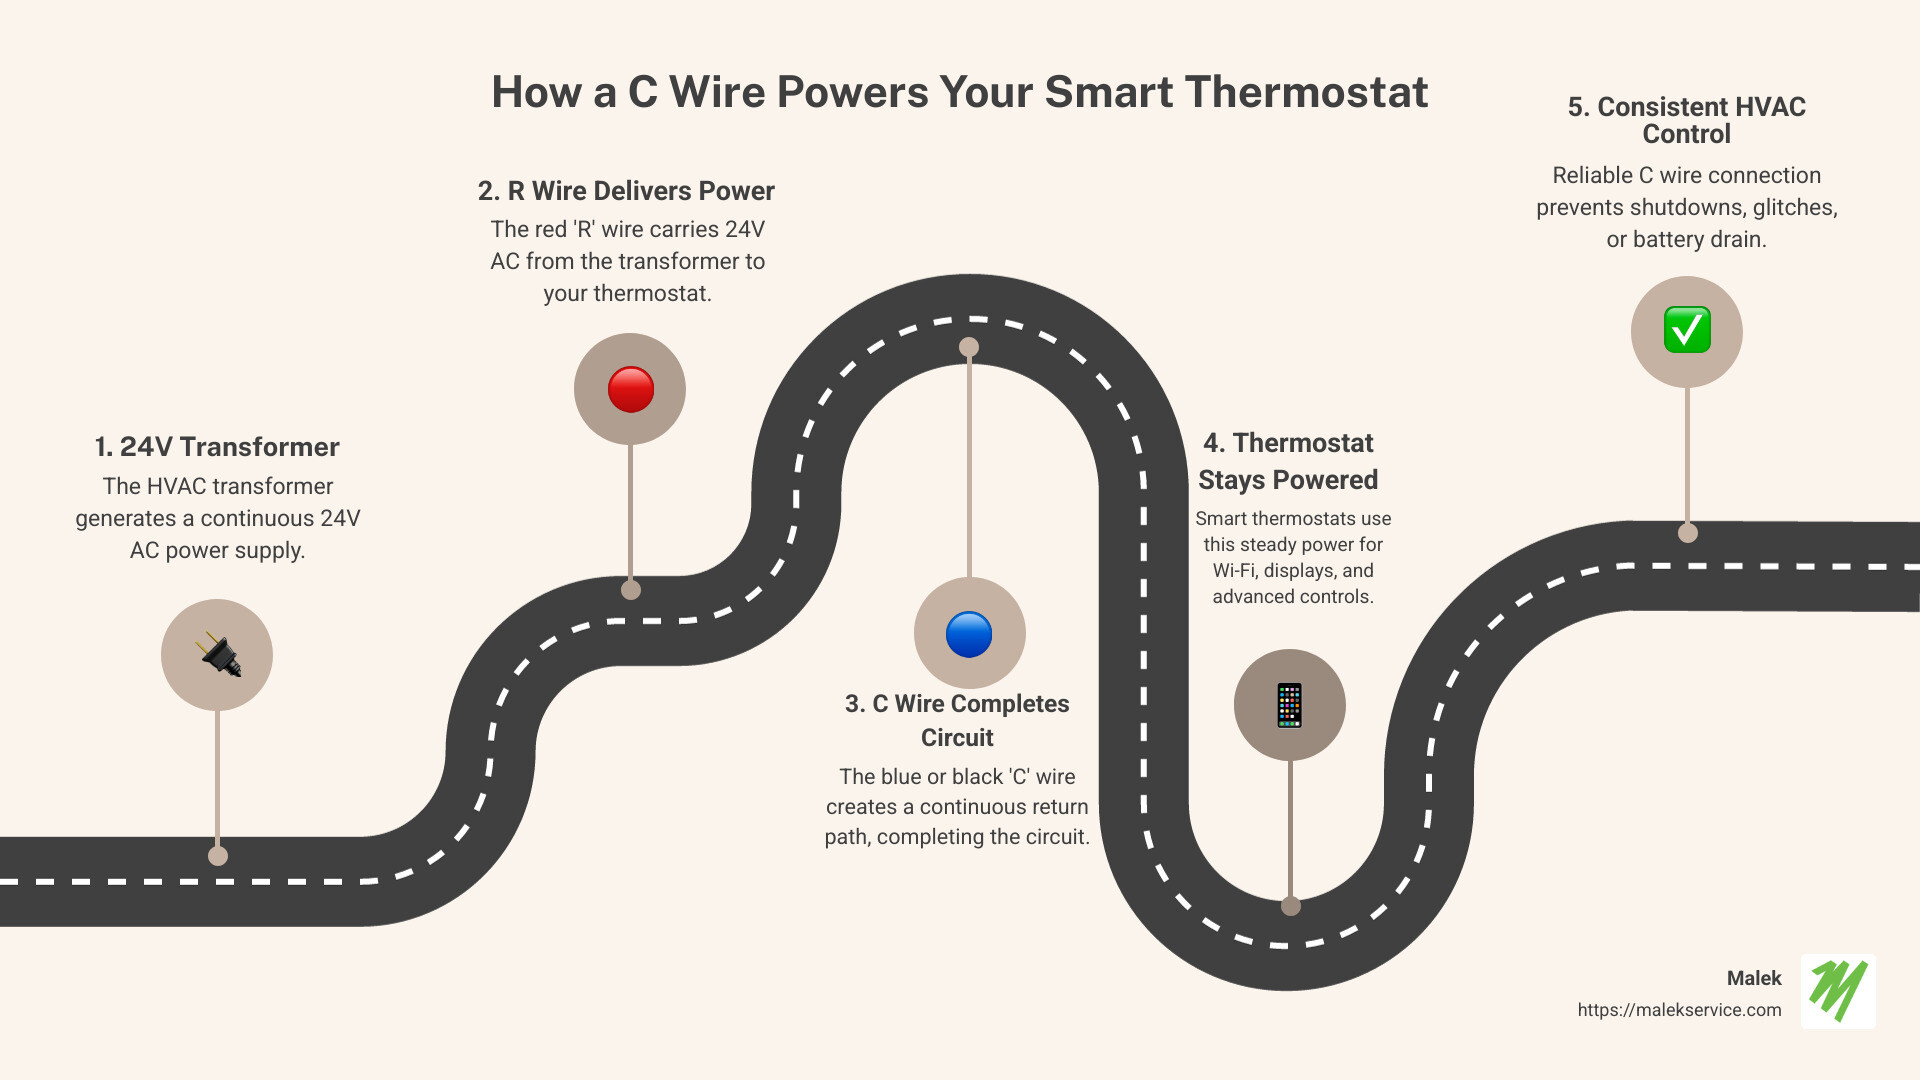
The Role of the HVAC Transformer
At the heart of your HVAC system sits a humble transformer. This small but mighty device converts your home’s standard 120V AC power down to a safer 24 VAC that your thermostat and control board use.
Your transformer has two important output terminals:
- The R terminal (sometimes split into Rh for heating and Rc for cooling) delivers the 24V power
- The C terminal provides the return path to complete the electrical circuit
Think about it like a garden hose – water needs both a way in and a way out to flow properly. In your thermostat system, electricity flows from the transformer through the R wire to power your thermostat, then returns through the C wire to complete the circuit.
Most residential HVAC transformers have a VA (Volt-Ampere) rating around 40 VA, which means they can safely provide enough power for your thermostat and control board components without overheating.
Signs You’re Missing a Reliable C Wire
How can you tell if C wire issues are causing your thermostat troubles? Watch for these telltale symptoms:
Your thermostat’s display goes blank or dims randomly – especially when the Wi-Fi is active. This happens because the thermostat doesn’t have enough continuous power to keep everything running.
Wi-Fi connectivity becomes spotty or drops entirely. Many homeowners blame their internet provider when it’s actually their thermostat’s power supply causing the disconnects.
Batteries drain surprisingly fast in models with battery backup. When Jim from Bryan called us, he was replacing batteries weekly in his new smart thermostat. After we installed a proper C wire, his battery backup lasted for months as designed.
You might also notice strange error codes on the display, unexplained system short-cycling (turning on and off rapidly), or hear clicking sounds from your control board as the thermostat tries to “steal” power.
“One customer was convinced her entire HVAC system was failing because of the strange noises and operation,” recalls our service manager. “She was relieved to learn it was just a missing C wire causing the chaos.”
If you’re experiencing any of these issues, it’s worth checking out our detailed guide on thermostat wiring for more troubleshooting tips.
The good news? Adding a C wire connection is often straightforward, and the benefits – reliable operation, full smart features, and no more frustrating glitches – make it well worth the effort. In the next section, we’ll help you determine whether you already have a C wire hiding in your walls.
Do You Have a C Wire? How to Check & Test
Before diving into any thermostat modifications, let’s figure out if you already have a C wire hiding in plain sight. You’d be surprised how often we find one during service calls!
First things first: turn off power to your HVAC system at the circuit breaker. Safety always comes first when dealing with any wiring, even low-voltage systems. Once that’s done, gently remove your thermostat from its wall plate – most modern models simply pull straight off or unclip with light pressure.
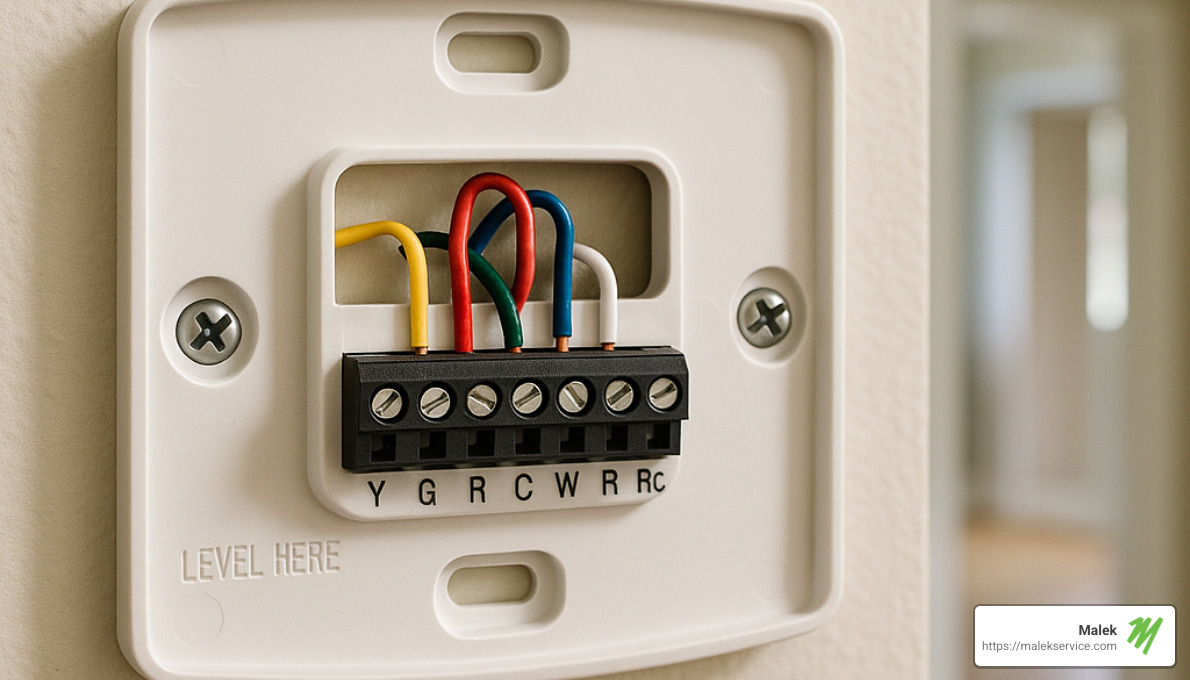
Take a good look at the wiring terminals. Are you seeing a wire connected to a terminal labeled “C”? If yes, congratulations! You’ve already got a thermostat wiring with C wire setup. This wire is typically blue or black, though some installers might have used brown or purple instead.
Don’t see anything connected to the C terminal? Don’t worry just yet – we have more detective work to do.
Hidden or Unused Conductors Behind the Wall
“I can’t tell you how many times I’ve found a perfectly good C wire tucked away behind a thermostat,” says Mark, one of our senior techs at Malek. “Builders often install more wires than needed, thinking ahead to future upgrades.”
Gently pull the wire bundle a bit further from the wall (careful not to yank too hard). Look for any unconnected wires that might be folded back or wrapped with electrical tape. That unused blue or black wire could be your ticket to smart thermostat happiness.
In homes built in the last 20-30 years, contractors often ran 5-wire or even 8-wire cable, but only connected the minimum wires needed for the basic thermostat at that time. That means you might have spare conductors just waiting to be put to work.
About a third of our service calls for thermostat wiring with c wire installations end with the happy find of an unused wire that can be repurposed. If you’re still unsure about your wiring, most thermostat manufacturers offer online wire-picker tools that can help identify your specific configuration.
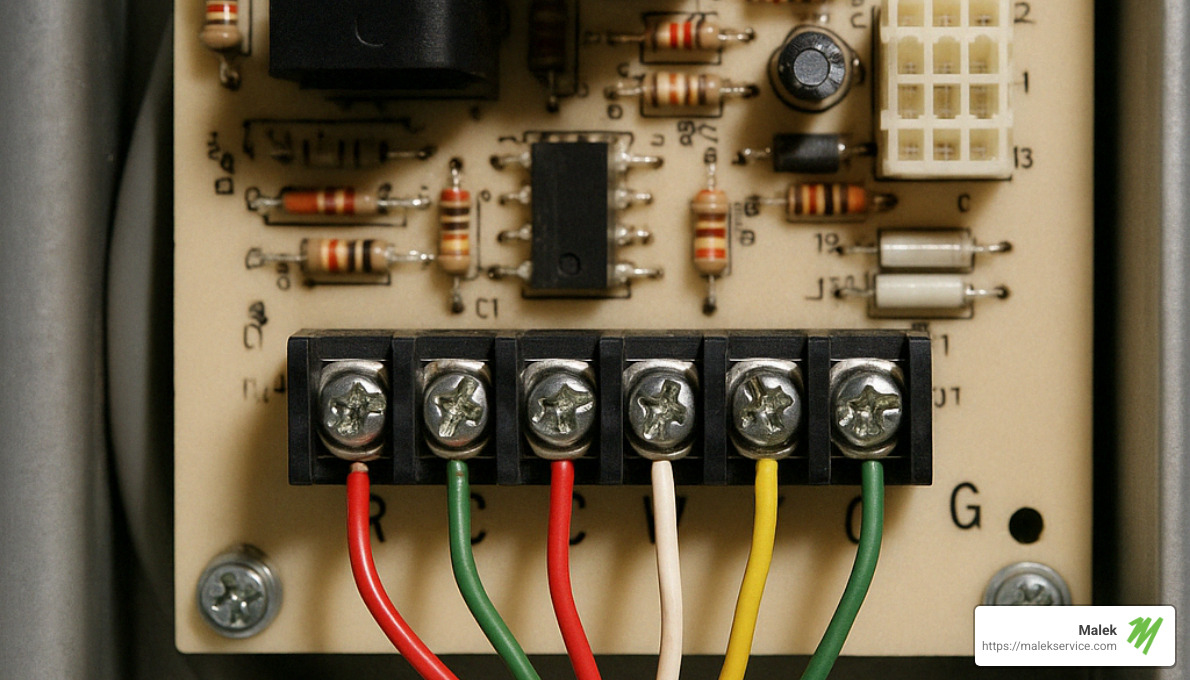
Verifying at the Furnace or Air-Handler
Finding a potential C wire at the thermostat is just half the battle – you need to confirm it’s properly connected at the other end too.
With the power still off, locate your furnace or air handler and remove the access panel. You’ll typically need to unscrew a few fasteners or turn some knobs. Some units have a safety switch that cuts power when the panel is removed – that’s fine, but still ensure the breaker is off for maximum safety.
Inside, you’ll find the control board – it looks like a circuit board with multiple wire terminals. Look for a terminal labeled “C,” “COM,” or “Common.” Is there a wire connected here that matches the color of your potential C wire at the thermostat? If so, you’re in business!
“The control board is really the command center of your HVAC system,” explains our technical director at Malek. “Everything has to connect here properly, including that crucial C wire that completes the circuit for your thermostat’s power.”
For absolute certainty, grab a multimeter for a quick test. Temporarily restore power to your system, set your multimeter to measure AC voltage, and place one probe on the R terminal and the other on the C terminal. You should read approximately 24-28 volts AC. Once confirmed, turn the power off again before proceeding with any changes.
If this all sounds a bit technical, don’t worry. At Malek Service, we’ve helped countless homeowners across Bryan, College Station and surrounding areas identify and properly connect their C wires. If you’re not comfortable performing these checks yourself, our licensed technicians can help you need a C wire for your thermostat without the guesswork or risk.
Thermostat Wiring with C Wire: Color Codes & Compatibility
Understanding thermostat wire color codes is like learning a new language – one that speaks directly to your home’s comfort system. While there’s an industry standard for these colors, I’ve seen plenty of homes (especially older ones) where the previous installer got a bit creative with their color choices.

Here’s what you’ll typically find when looking at thermostat wiring with c wire in most homes:
| Terminal | Color | Function |
|---|---|---|
| R (or Rh/Rc) | Red | 24V power supply from transformer |
| C | Blue or Black | Common (completes 24V circuit) |
| W (or W1) | White | Heat |
| Y (or Y1) | Yellow | Cooling/compressor |
| G | Green | Fan |
| O/B | Orange or Dark Blue | Reversing valve for heat pumps |
| W2 | Brown/Other | Second stage heat |
| Y2 | Blue/Pink/Other | Second stage cooling |
Standard Low-Voltage Color Map
Before diving deeper into color codes, let’s clear up a common confusion that I’ve seen trip up many homeowners. There are actually two completely different types of thermostat systems out there:
Low-Voltage Systems (24V) are what you’ll find in about 90% of homes. These systems use thin wires (about the thickness of a spaghetti noodle) and run on a safer 24 volts. These are the systems where thermostat wiring with c wire matters. They power most forced-air furnaces, central air conditioners, and heat pumps you’ll encounter.
In contrast, Line-Voltage Systems (120V/240V) use much thicker wires and connect directly to your home’s main electrical supply. You’ll find these in electric baseboard heaters, radiant ceiling heat, and some wall heaters. They’re an entirely different animal and aren’t compatible with standard smart thermostats.
“I once had a customer who purchased an expensive smart thermostat online, only to find they had baseboard heating with line voltage,” shares Mike, one of our senior technicians. “Unfortunately, they couldn’t use it at all. Always check your system type before shopping!”
For standard low-voltage systems, the color conventions are helpful guidelines, but I always recommend checking both ends of a wire rather than trusting colors alone. I’ve seen blue wires connected to Y terminals and yellow wires connected to C terminals. The previous installer might have run out of the standard color and made do with what they had.
Compatibility of Major Smart Thermostats
Not all smart thermostats have the same relationship with the C wire. Some demand it, some can work around it, and some don’t care at all:
C Wire Always Required devices include most Ecobee models (though they cleverly include a Power Extender Kit to help you out) and all Honeywell Wi-Fi models. These thermostats have power-hungry features like bright color touchscreens and constant Wi-Fi connectivity that simply need that steady power supply.
C Wire Sometimes Required thermostats like the Nest Learning Thermostat and Nest Thermostat E attempt to work without a C wire by “power stealing” from other wires. This works in some systems but can cause headaches in others.
C Wire Not Required options like the Sensi Smart Thermostat and Sensi Lite can operate on batteries alone, though even they will benefit from having a C wire for more reliable operation.
Sarah from College Station shared her experience: “My Nest worked fine without a C wire during spring, but once summer hit and the AC was running constantly, the battery kept dying. Malek added a C wire for me, and it’s been rock-solid ever since.”
The truth is, even for thermostats that claim to work without a C wire, having one installed often prevents strange system behaviors like furnace short-cycling, phantom fan operation, or Wi-Fi connectivity issues. It’s like having a dedicated power line versus trying to siphon electricity when no one’s looking.
If you’re unsure about your system’s compatibility with a smart thermostat, our team at Malek can help assess your current setup and recommend the best solution. We’ve seen just about every wiring configuration imaginable in homes across Brazos County and beyond. For more information about options when you have thermostat wiring no C wire, check out our dedicated guide.
Adding/Connecting a C Wire: Step-by-Step Methods
Ready to add a C wire to your thermostat? I’ve helped hundreds of homeowners through this process, and I’ll walk you through your options from easiest to most involved.
Before you start any method, let’s cover some important safety steps:
First, shut off power to your HVAC system at the circuit breaker – this isn’t optional, it’s essential for your safety! Next, snap a quick photo of your current wiring setup (trust me, you’ll thank yourself later). Then, label each wire with painter’s tape or those handy stickers that come with most new thermostats. Finally, gather your tools: screwdriver, wire stripper, needle-nose pliers, and electrical tape.
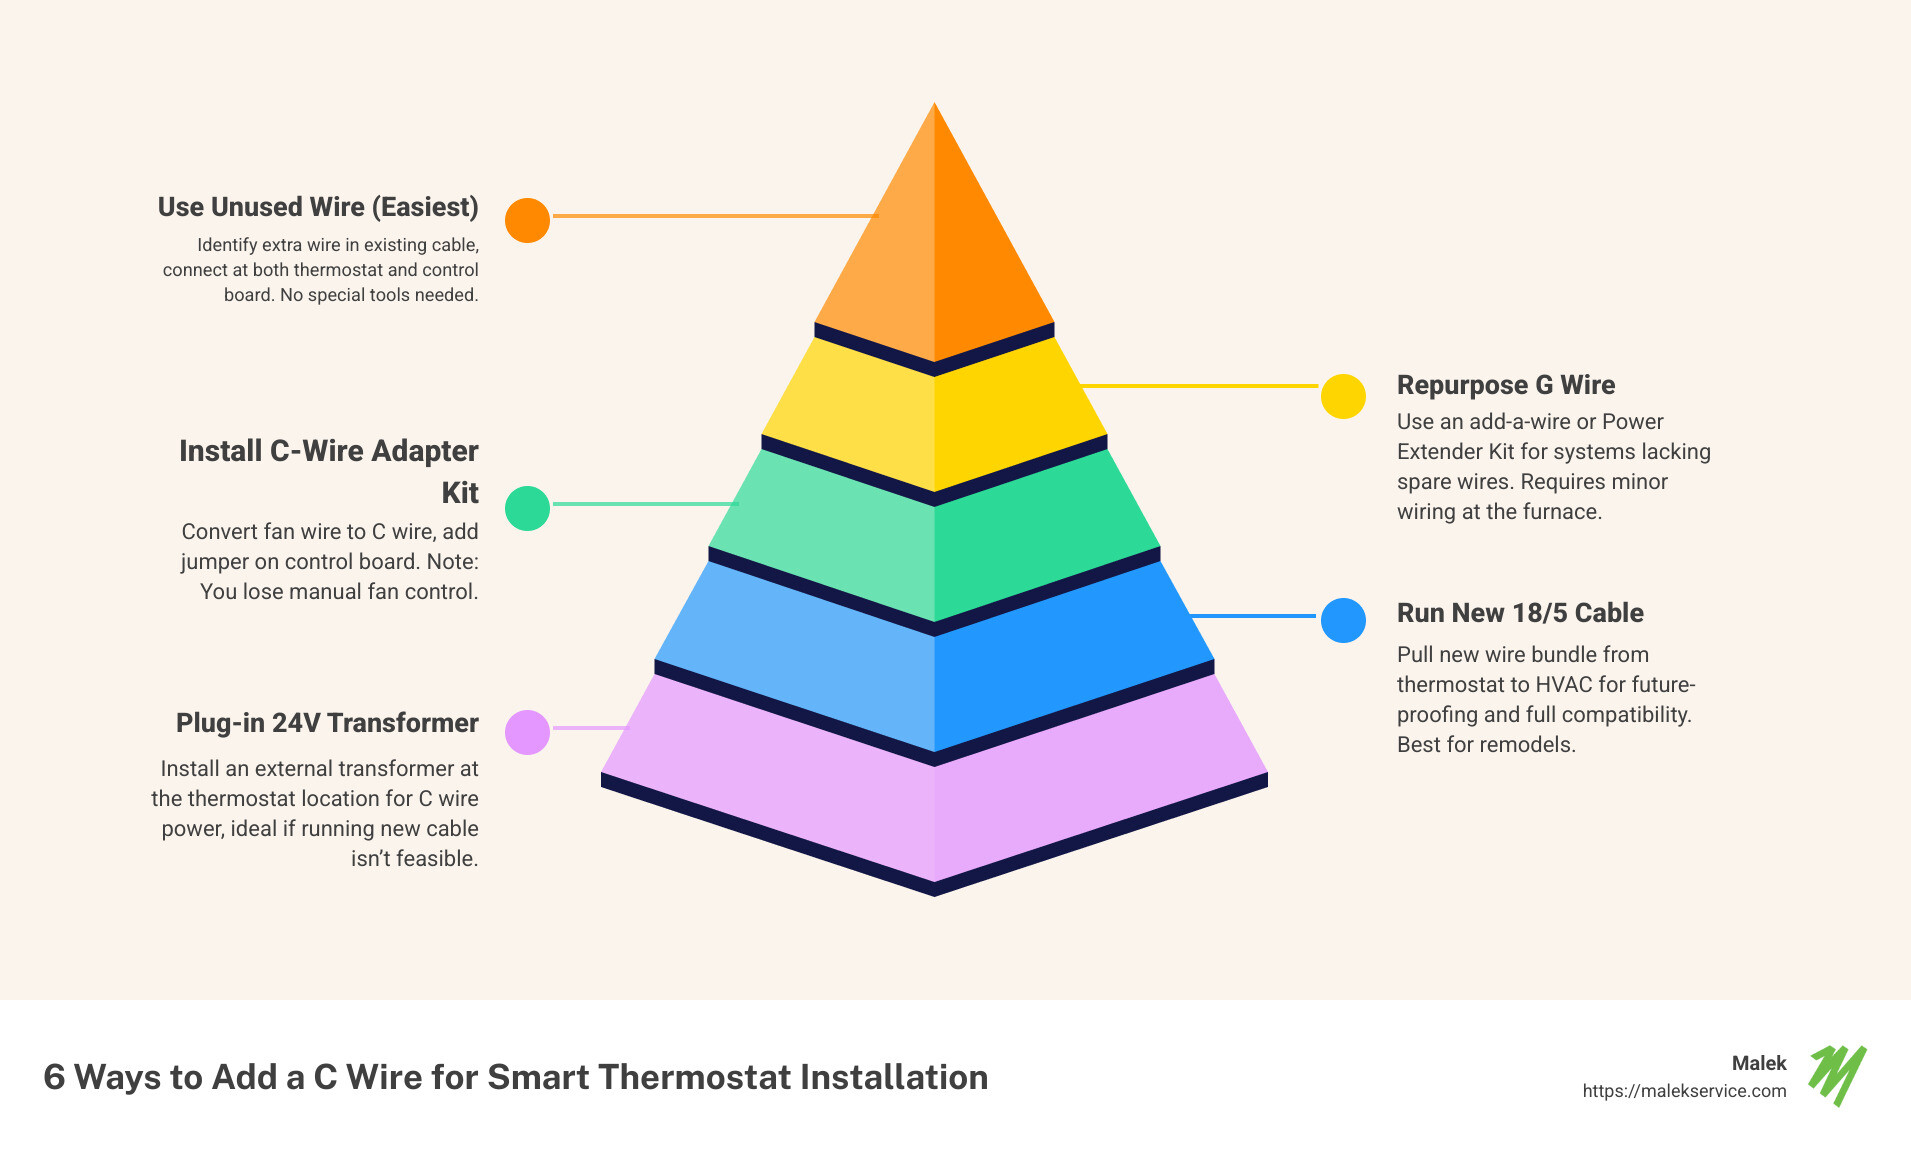
Option 1: Use an Unused Wire for thermostat wiring with C wire
This is by far the simplest solution – and more common than you might think! Just last week, I helped a customer in College Station who was delighted to find he already had everything he needed hiding behind his wall.
To check if this option works for you, look for an unused wire in your thermostat cable bundle (often blue, black, or brown). If you find one, connect it to the C terminal on your thermostat, then head to your furnace control board and connect the same wire to the C terminal there. Restore power, and you’re done!
“I was amazed to find an unused blue wire coiled up behind my old thermostat,” one of our customers in Franklin told me. “After connecting it at both ends, my new smart thermostat worked perfectly – no more battery warnings!”
Option 2: Repurpose the G Fan Line for thermostat wiring with C wire
If you don’t have a spare wire, you can repurpose the G (fan) wire as your C wire. This approach is fairly straightforward: disconnect the G wire from both your thermostat and control board, then reconnect it to the C terminals instead. At the control board, add a small jumper wire between the Y and G terminals.
The catch? You’ll lose independent fan control – your fan will only run during heating or cooling cycles. For many homeowners, this trade-off is worth it in the short term, but they often miss the ability to circulate air without heating or cooling, especially during our mild Texas spring and fall seasons.
Option 3: Install a C-Wire Adapter Kit
Several manufacturers offer clever adapter kits that can provide the necessary power without running new wires. The Venstar Add-A-Wire, Ecobee Power Extender Kit (PEK), and Google Nest Power Connector are all popular options we’ve installed for customers.
Each kit works a bit differently, but they all essentially combine the functions of existing wires to free up a wire for C wire use. The installation process varies by product, so you’ll want to follow the manufacturer’s specific instructions.
One of our customers in Huntsville was initially intimidated by the wiring process but found the Ecobee PEK surprisingly manageable. “The instructions were clear, and now my thermostat has stable power without any issues,” he shared.
Not sure which adapter is right for your system? Our team at Malek Service can help determine the most compatible option for your specific setup. For more information about our thermostat services, just give us a call.
Option 4: Run New 18/5 Cable
For a permanent, future-proof solution, running entirely new thermostat cable is often the best approach. This involves purchasing 18/5 thermostat cable (18-gauge, 5-conductor wire), disconnecting your existing wiring, and running the new cable from your thermostat to your HVAC control board.
If possible, you can use the old wire to pull the new wire through the wall. If not, you might need to find an alternative route through your basement, attic, or crawlspace. Once installed, connect all necessary wires at both ends, restore power, and test.
“We always recommend 18/5 cable even for heat-only systems,” our installation supervisor often tells customers. “The extra conductors future-proof your home in case you later add air conditioning or upgrade to a heat pump.”
While this method requires more skill and potentially some drywall work, it provides the most reliable solution for thermostat wiring with c wire concerns.
Option 5: Plug-In 24V Transformer
If running new wire isn’t feasible, an external transformer can be a great alternative. This approach involves purchasing a 24V AC transformer with a C-wire adapter, plugging it into a nearby outlet, and running the low-voltage wires to your thermostat.
You’ll connect one wire to the C terminal and the other to RC, then conceal the wires along your baseboards or walls. This solution works particularly well in rental properties or homes where fishing wire through walls isn’t practical.
Just be sure to use a UL-listed transformer rated for 24V AC output at 40VA or higher. And remember, the transformer needs to be within about 20 feet of your thermostat, so plan your wire routing accordingly.
Option 6: Choose a Battery-Powered or Power-Stealing Thermostat
If none of the above options work for your situation, you might consider a thermostat designed to work without a C wire. Battery-powered options like the Sensi Smart Thermostat or certain Honeywell models can operate on batteries alone. Alternatively, some Nest models can “steal” small amounts of power from heating or cooling wires.
While this is certainly the easiest solution, it comes with trade-offs. Battery-powered thermostats require regular battery changes (typically every 3-6 months), and power-stealing thermostats can sometimes cause system issues like short cycling or intermittent operation.
A customer in Caldwell initially chose this route but eventually called us for a proper C wire installation. “I got tired of changing batteries every few months,” he explained. “Having Malek install a proper C wire was worth every penny for the peace of mind.”
At Malek Service, we’ve seen every possible thermostat wiring with C wire scenario across Brazos Valley. Whether you want to tackle this as a DIY project or prefer professional installation, we’re here to help ensure your smart thermostat gets the reliable power it needs.
Risks, Workarounds, and When to Call a Pro
Working with thermostat wiring with C wire can be straightforward, but it’s not without risks. I’ve seen plenty of DIY projects go sideways in my years at Malek Service, and I’d hate for that to happen to you.
Safety Precautions You Can’t Skip
Safety first isn’t just a catchy phrase when it comes to electrical work. Even though thermostat wiring operates at a relatively safe 24 volts, the systems they connect to pack a much more dangerous punch.
Always turn off power at the circuit breaker before touching any wires. This seems obvious, but you’d be surprised how many homeowners skip this critical step. Our safety director often says, “The most common mistake we see is people forgetting to turn off power before starting. Even though thermostat wiring is low-voltage, the control board and transformer are connected to high-voltage lines that can be dangerous.”
After turning off the power, verify it’s actually off by testing the thermostat or using a voltage tester. I’ve encountered situations where customers thought they’d turned off the right breaker, only to find they were still working with live wires.
Before disconnecting anything, take clear photos of your original connections and label all wires. This simple step can save hours of frustration later. Those little colored stickers that come with new thermostats aren’t just decorative – they’re lifesavers when you’re trying to remember which wire goes where!
When reassembling your furnace access panel, make sure the door safety switch is properly engaged. This switch prevents your system from running while the panel is open, and if it’s not seated correctly, your system won’t operate at all.
Finally, ensure all wire connections are tight and secure. Loose connections can cause intermittent problems that are incredibly frustrating to diagnose, or worse, create shorts that damage expensive components.
When DIY Becomes Dangerous
While many homeowners successfully install their own C wire, there are situations where calling in professionals like our team at Malek Service is the smarter choice.
If you have a line-voltage thermostat system (120V/240V), stop right there. These systems, commonly found in electric baseboard heaters, require specialized knowledge and carry serious shock and fire risks. This isn’t the place for DIY experimentation.
Difficult-to-access furnaces or air handlers present another challenge. If reaching your equipment requires contortionist-level flexibility or removing structural elements, you’re better off calling us. Last month, we helped a customer in College Station who had attempted to reach his attic-mounted air handler by balancing on joists, nearly putting his foot through the ceiling.
The presence of water damage, mold, or possible asbestos near wiring areas should immediately halt your DIY project. These environmental hazards require professional remediation before electrical work can safely proceed.
Multiple transformer systems can be particularly tricky. If you have separate heating and cooling units, each might have its own transformer, complicating the C wire installation significantly. One wrong connection could damage both systems.
If you’ve already attempted a DIY solution and your system isn’t working correctly, don’t keep experimenting. “We had a customer in Somerville who tried to install a C wire himself but accidentally shorted the control board, resulting in a $300 repair,” recalls our service manager. “Sometimes saving money on installation can cost more in the long run.”
Finally, check if your warranty requires professional installation. Many manufacturers will void warranties if equipment isn’t installed by licensed professionals. That $50 you saved doing it yourself could cost thousands if warranty coverage is denied.
For complex systems or if you’re simply uncomfortable working with electrical components, our experienced team at Malek Service offers professional AC tune-up services that include thorough thermostat inspection and installation.
For additional guidance, this Honeywell instructional video provides helpful visual instructions on C wire installation. But remember, professional help from Malek is just a phone call away if you need it. We’d rather you call us before there’s a problem than after something goes wrong!
Frequently Asked Questions about Thermostat Wiring with C Wire
Do smart thermostats always require a C wire?
The truth about smart thermostats and C wires isn’t as straightforward as many homeowners expect. While most modern smart thermostats perform best with a C wire, not all absolutely require one to function.
“I always tell my customers to think of the C wire like premium fuel for a sports car,” says Mark, one of our senior technicians at Malek Service. “Can some cars run on regular gas? Sure. But they won’t perform at their best, and you might experience problems down the road.”
Some models, like the Nest Learning Thermostat, can operate without a C wire by using a technique called “power stealing” – essentially borrowing small amounts of power from your heating or cooling wires. However, we’ve found that about 70% of these installations eventually develop frustrating problems like Wi-Fi disconnections, erratic temperature readings, or system short-cycling.
Battery-powered options like certain Sensi models eliminate the need for a C wire completely, but they come with their own drawback: regular battery replacements that always seem to be needed at the most inconvenient times.
For reliable, trouble-free operation of your smart thermostat, thermostat wiring with C wire remains the gold standard that we recommend to all our customers.
Can I use the ground wire as my C wire?
Absolutely not! This is one of the most dangerous misconceptions we encounter, and it makes our technicians wince every time they hear it suggested.
The C wire is not a ground wire – they serve completely different functions in your electrical system. The C wire is the common side of your 24VAC transformer that completes a circuit and carries current. A ground wire, on the other hand, is a safety feature designed to prevent electrical shocks.
“Using a ground wire as a C wire would be like using your home’s water pipes for electrical wiring,” explains our electrical specialist. “Both are conductive, but they serve entirely different purposes, and mixing them up creates serious hazards.”
Repurposing a ground wire as a C wire could potentially damage your expensive HVAC equipment, create fire risks, or even cause electrical shock. This is definitely one shortcut that’s never worth taking.
What’s the cost to have a professional install a C wire?
When customers call about thermostat wiring with C wire installation, their first question is usually about cost. While every home is different, we can provide some general guidelines based on the complexity of your specific situation:
If you’re lucky enough to have an unused wire behind your thermostat that just needs to be connected at both ends, you’re looking at approximately $75-150 for professional installation. This is the best-case scenario that we find in many newer homes.
For situations requiring a C-wire adapter installation, expect to pay between $150-250. This middle-ground solution works well for many homes where running new wiring would be challenging.
The most comprehensive solution—running completely new thermostat wire through your walls—typically costs between $200-400, depending on the complexity of your home’s construction and the accessibility of your HVAC system.
One of our customers in Hempstead recently shared: “I was quoted over $300 by another company just to add a C wire. Malek did it for half that price and also performed a system check that identified a minor issue before it became a major problem.”
At Malek Service, we’re transparent about our pricing and often can bundle C wire installation with our AC tune-up services for additional savings. We believe in solving your immediate need while also looking out for your system’s long-term health.
Conclusion
Thermostat wiring with C wire might seem daunting at first glance, but with the right guidance, it’s a challenge you can absolutely overcome. Throughout this guide, we’ve walked through everything from identifying your existing wiring to implementing various solutions that can power your smart thermostat reliably.
Whether you found an unused blue wire tucked behind your wall plate (what a satisfying find!), installed a C-wire adapter kit, or decided to future-proof your home with new 18/5 cable, you’re now equipped to enjoy all the benefits of modern smart thermostat technology.
I’ve seen how a properly powered smart thermostat transforms a home’s comfort and efficiency. Just last month, I visited a customer in College Station who was amazed at how her new Ecobee (with properly connected C wire) learned her family’s schedule within days and started trimming their energy bills immediately.
The energy savings are real and substantial. Homeowners with properly installed smart thermostats typically save between 10-23% on their HVAC energy costs. That’s not just good for your wallet—it’s good for the planet too.
At Malek Service, our team of friendly, experienced technicians serves communities throughout our service area with the kind of personalized attention that big companies simply can’t match. We understand that every home is different, and we take pride in finding the right thermostat wiring with C wire solution for your specific situation.
Sometimes, despite your best DIY intentions, you might encounter a scenario where professional help makes sense. Maybe your walls are particularly challenging to fish wire through, or perhaps you found your system has multiple transformers. That’s when our team really shines—turning frustration into relief with efficient, affordable solutions.
A properly installed smart thermostat isn’t just about convenience—though remotely adjusting your home’s temperature from your phone is pretty wonderful! It’s about creating the perfect environment for your family while maximizing energy efficiency.
Ready to upgrade your home’s climate control system or need a helping hand with C wire installation? The friendly team at Malek Service is just a phone call away. We’re passionate about helping you enjoy all the comfort, convenience, and savings that come with a properly wired smart thermostat. For expert assistance with all your HVAC installation needs, give us a call today—we’d love to help you breathe easier.